
Are you keen to index your WordPress website on Google? We’ve created a simple guide that will explain the exact steps to take when indexing.
For any website to be indexed by Google, it must be visited and analyzed by the Google crawler. This is a bot that finds the websites, crawls through pages, and stores them in the Google index. This is a crucial step if you want your website to rank because only indexed pages can appear in search results.
In many cases, Google will crawl and index your website on its own accord, but you shouldn’t simply wait for this to happen. This can take weeks and in some cases, may not happen at all. However, there are multiple steps you can take to prompt Google and speed up the indexing process. In this article, we’ll go through 5 major steps to do this. We’ll also demonstrate how SEOPress PRO, an all-in-one SEO plugin for WordPress, will make it easier for you.
Step 1: Get your WordPress website ready for indexing
Before indexing your WordPress website on Google, there are some additional steps you should take that will be extremely beneficial. Consider this the preparation stage.
Ensure your site is accessible to Google
Just because your website is published, it doesn’t mean it’s easy for Google to analyze it. If your website is not ready to launch, set it as “unpublished”. This allows you to ensure all content matches your intent, all the keywords are included, and you have metadata and optimized URLs on every page. Neglect this step, and you risk Google not understanding your website, making it harder to index.
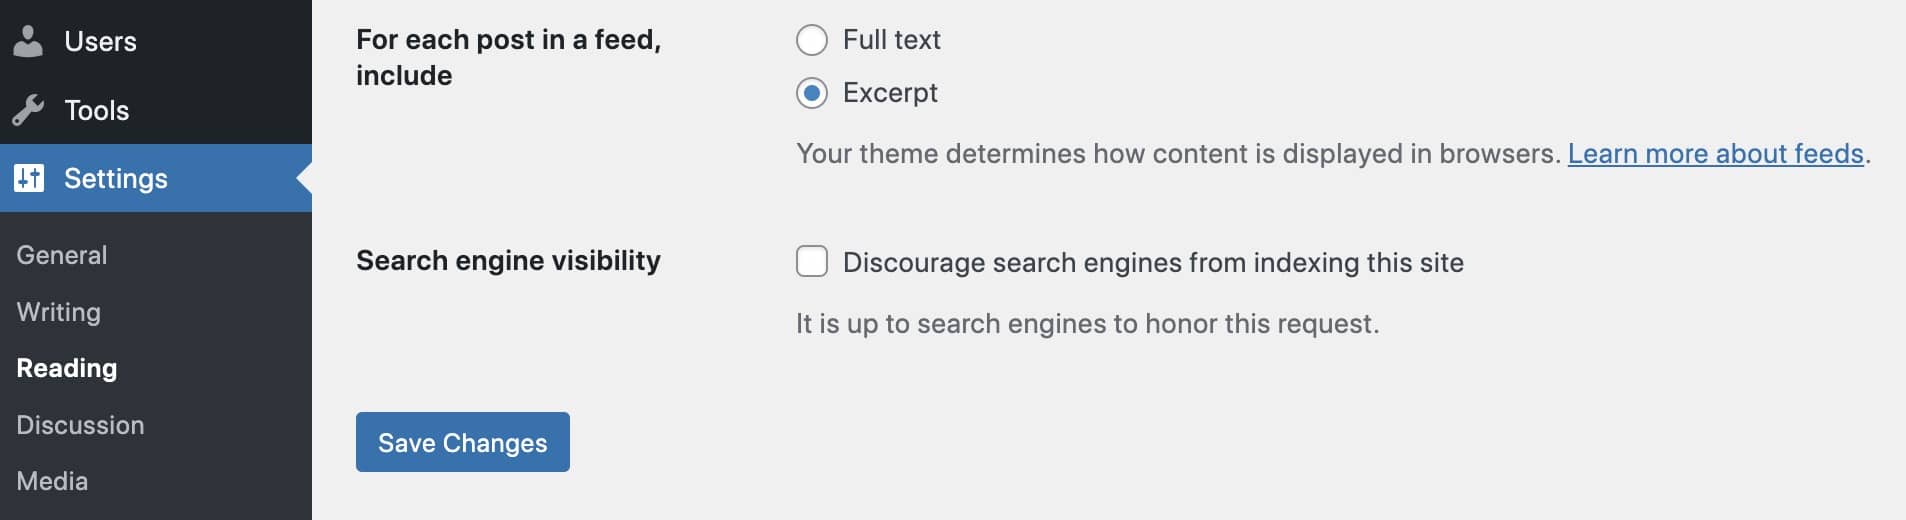
Furthermore, check that your WordPress settings aren’t configured to discourage search engines from crawling your site. Navigate to Settings > Reading > Site Visibility, and you’ll see a toggle box that says, “Discourage search engines from indexing this site”. Make sure this box is unchecked to make your site visible to search engine crawlers. SEOPress will display a notification from our SEO dashboard page if this box is checked, so you’re aware of how visible your site is.
Crucially, you will need to check that your website pages aren’t set to noindex. Again, SEOPress helps you with this by immediately notifying you if it’s the case from the SEO dashboard page, Notifications center.
Create an XML sitemap
An XML sitemap is a list of your site’s URLs, created for search engine bots. Having one of these lets search engines know how your site is structured. It dictates information on the relationships between pages and how important certain pages are.
WordPress will automatically create a sitemap for you, but it comes with limitations. SEOPress Free can generate a much more advanced XML sitemap that lets you add custom posts and taxonomies in a few clicks. You can also add images to your sitemap, though they are only available in the source code. Don’t be surprised when there is no visual difference after enabling this feature.
If you upgrade to SEOPress PRO, you’ll be able to create even more advanced sitemaps, such as by adding videos; or creating sitemaps just for Google News.

Check your Robots.txt file
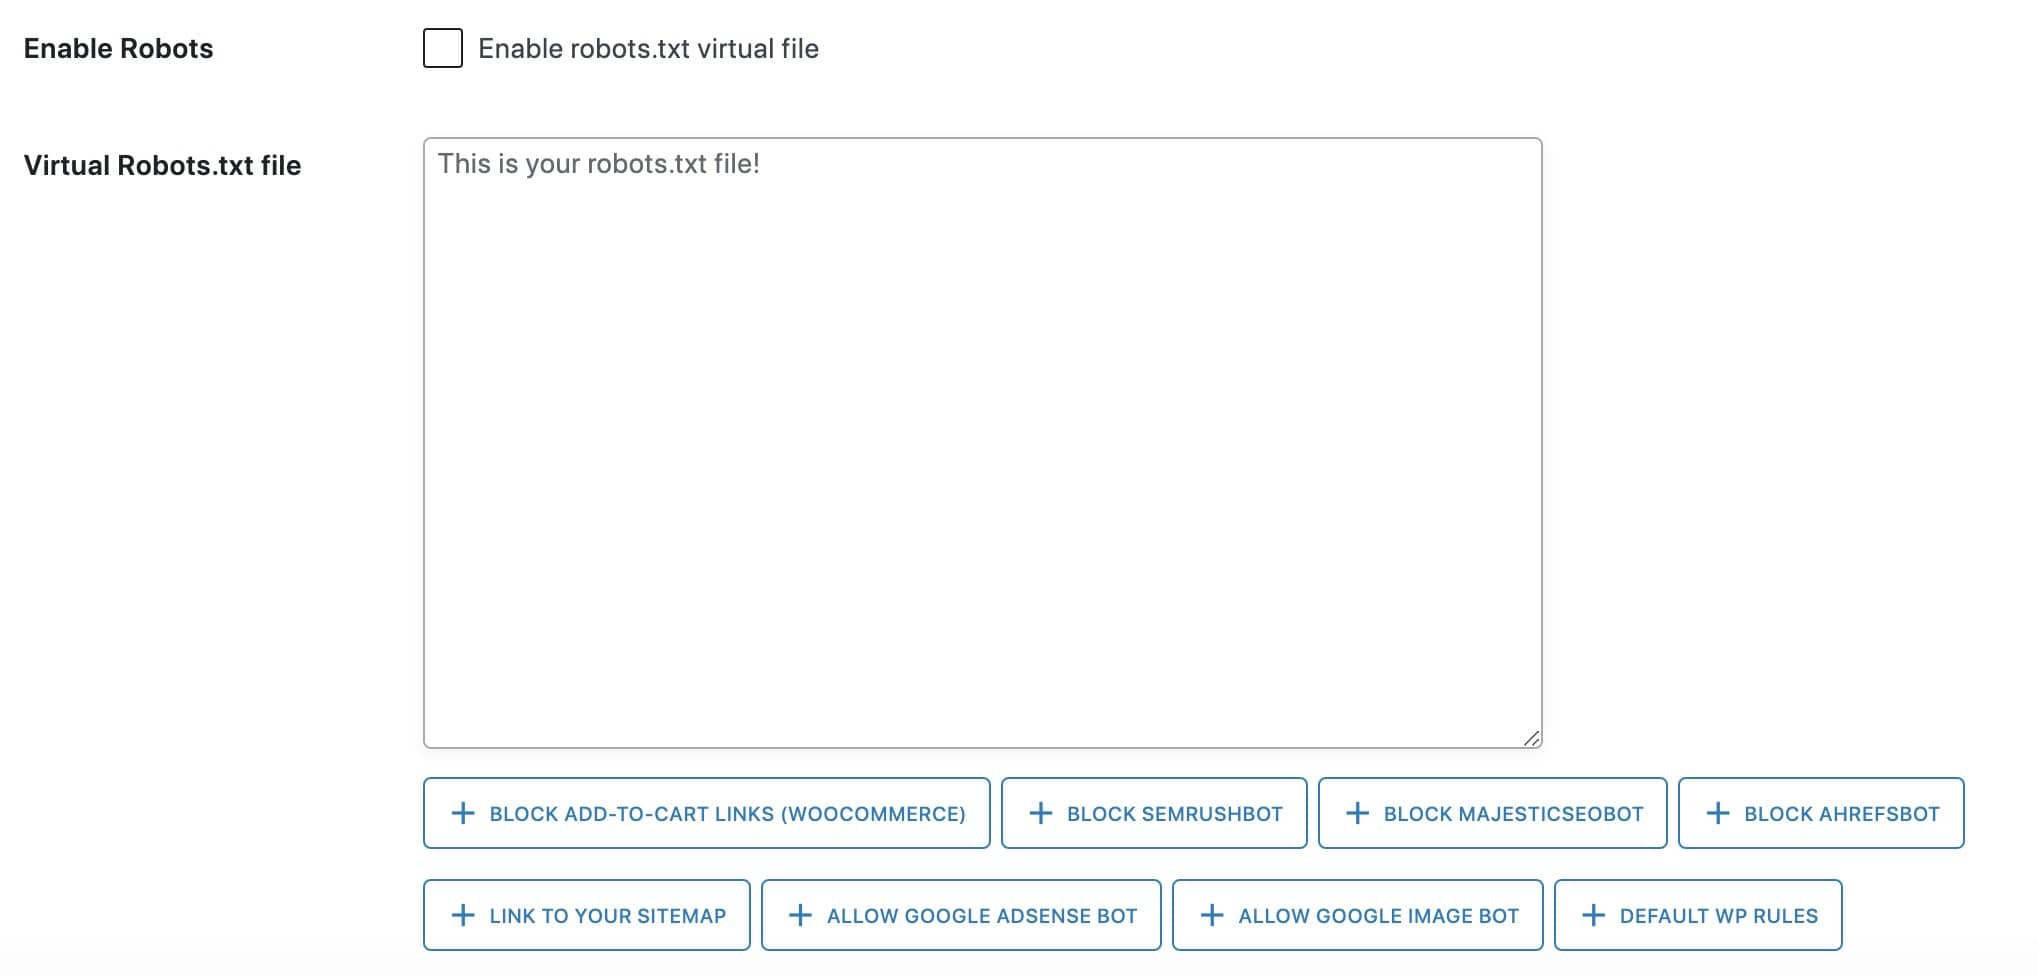
A Robots.txt file is used to help search engines deduce which URLs they can or can’t crawl on your website. This is a command that stops Google from indexing certain pages that perhaps you don’t want the search engine to see. SEOPress PRO lets you enable a virtual Robots.txt where you can easily set crawling rules, though this won’t bypass a physical file that’s created by your WordPress host.
Step 2: Submit your site to Google
This step will put your website in the queue for indexing. If your site and pages are valuable, Google will find them and index them regardless. However, do everything in your power to point Google to your site. Follow these steps:
Sign up for a Google Search Console Account
Google Search Console is a central hub for webmasters to check things like indexing status and crawling errors. Having an account helps you stay on top of things and optimize your site’s visibility. Additionally, you’re able to submit your sitemap here. Check out our in-depth guide to getting started with Google Search Console for more information.
Verify ownership of your site
Once you have an account, verify the ownership of your website. This is important so that you can take full advantage of Google Search Console’s features and manage your property. Google offers documentation about how to add your property (website) to GSC and verify your ownership using one of the several verification methods listed.
Submit your sitemap to Google
You should do this through the Sitemaps report in GSC. Effectively, it puts your sitemap in a queue for Google to crawl. SEOPress Free additionally has a feature that lets you ping Google your XML Sitemap directly through the WordPress plugin. However, if it is your first time submitting your sitemap, then we recommend doing this through Google Search Console and using SEOPress when you update your sitemap later on.

Submit URLs for indexing
Through GSC, you can use the URL inspection tool to submit individual URLs for indexing. It’s useful for new content or any pages that you suspect haven’t been picked up yet.
SEOPress Free offers a better way – instant indexing. This feature (automatically with IndexNow) ask search engines to index your posts and URLs without you needing to do anything. It’s completely free, and you can index up to 200 queries per day with Google Indexing API (10K with IndexNow). Submit batches of URLs and choose whether to index or remove them from indexing whenever you like. You can submit in batches of 100 URLs and can choose whether to submit them for indexing or remove them from indexing. SEOPress uses the Google Indexing API and IndexNow API for Bing and Yandex.
For more information about how to use this feature, check out SEOPress’s guide to the Google Instant Indexing API. Note that the Google Indexing API is not an official method, but it is acknowledged by Google and encouraged for many kinds of content, such as short-lived pages (e.g., job postings).
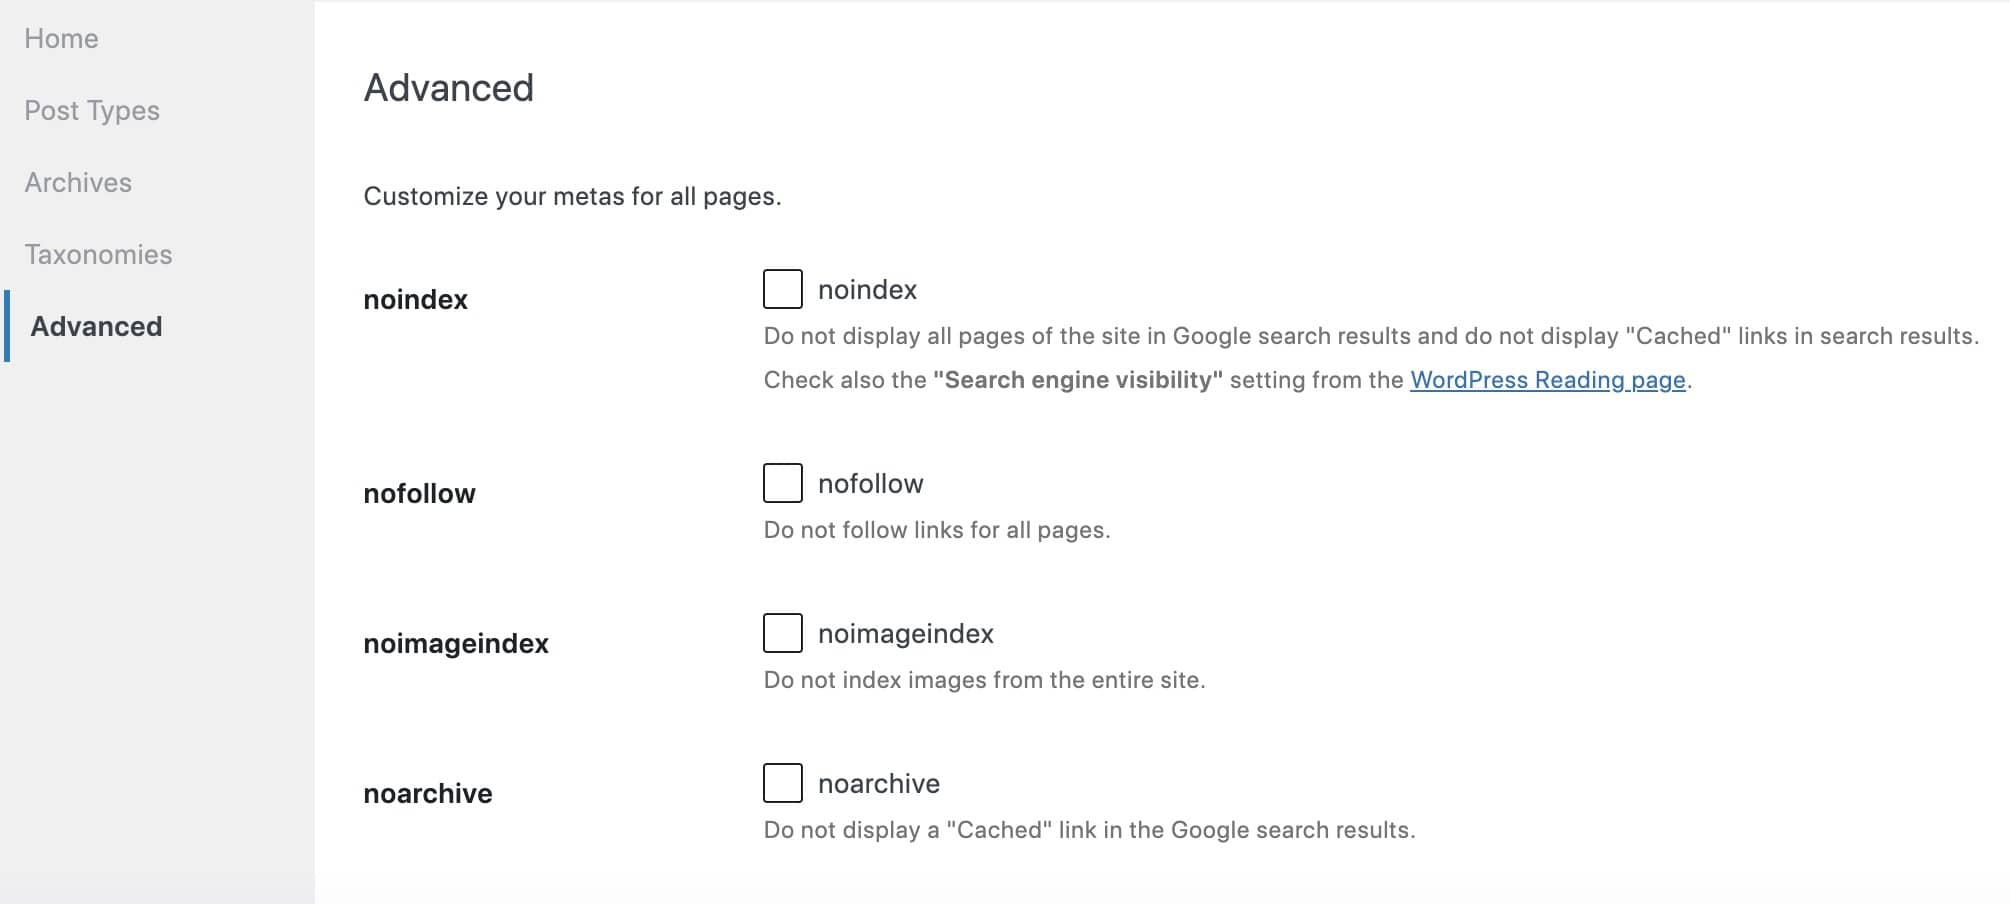
Additionally, SEOPress can also help you “noindex” certain pages you don’t wish to show up in search results. For example, you may not need your category pages to rank. The advantage to noindexing pages is that it will help with Google’s “crawl budget” and will focus on your more important pages.
You can do this for individual pages via the Metabox Advanced Tab while editing the page, or go to SEO, Titles & Metas to set noindexing rules for post types, archives, taxonomies, or all pages.
Step 3: Monitor your site’s performance with Search Console
Submitting a site to GSC won’t automatically mean it gets indexed. It can take weeks for this to happen. While you wait, you can monitor the situation from your end.
Check your site’s index status
Using the aforementioned URL Inspection Tool, you can check if individual URLs have been indexed or not. If they have, you will see extra information – such as when they were last crawled by Google and whether they’re listed as canonical links.
Identify possible crawl errors
GSC may contact you to say it was unable to crawl one or more URLs you submitted. When possible, it explains why this was the case. However, it then leaves it up to you to correct the error.
Google has provided a guide that lists the major reasons GSC may return crawl errors. Two common reasons are that your web design is too unintuitive for Google to crawl or that your website has a login page that blocks Google from reading your content. Look at all of the possible reasons, check your site, and make the necessary corrections.
Step 4: Optimize your site for better rankings
Not ranking at the rate you were expecting after indexing your site? Look into optimizing your website further. You should always be searching for new SEO opportunities, regardless of how well you’re performing, as good SEO is a constant work in progress. Here are some ideas to help you achieve better rankings:
Follow the 1 page, 1 keyword rule
Multiple pages targeting the same keyword is known as keyword cannibalization, and it can cause indexing problems as the search engine might not know which page it should serve up. Try to target a different keyword on each page to avoid this.
Avoid thin and duplicate content
Your most important pages should be substantial and cover the topic adequately. Any content with little or no value to the user will struggle to get indexed. Similarly, duplicate content is damaging. If you happen to have multiple versions of the same page on your site (e.g., translations), SEOPress will help you configure canonical URLs to stop them from flagging up as duplicate content.
Improve your existing content
Improving your on-page SEO will make it easier for Google to index your site and rank it highly. SEOPress’s Content Analysis feature is perfect for this. It offers multiple suggestions for improving on-page SEO, such as 16 different SEO checks for your content. The free version will let you define the subject of your article by adding an infinite number of keywords to run analysis on. Suggestions will be made by the tool to help you optimize content for SEO purposes.
Additionally, you can upgrade to the PRO version for extra content analysis features. With SEOPress PRO, you receive internal linking suggestions to help keep your site interconnected. Our tool automatically suggests up to 5 different internal links for each page to utilize.
Alongside this, the PRO version calls upon Google Suggest to find inspiration for new content – or to help you work on long tail keywords. All you have to do is enter a keyword or phrase to be presented with the top 10 Google suggestions right away. This is an easy way to ensure you’re producing content that your audience is interested in!
Publish more content
Content is king! Google won’t rank websites with hardly any content because they provide less value to users than sites with lots of regular, high-quality content. The frequency with which you publish matters a lot, though you enough need to make sure the content you post is high-quality and meets Google criteria for E-A-T.
When you make any updates to your content/pages, you can resubmit their URLs for indexing via the SEOPress dashboard. This speeds up the process of the next crawl, helping you achieve better rankings, faster.
Step 5: Monitor and track your progress
If your website has been indexed and has started to rank, it’s still crucial that you continually monitor your website’s progress. This is the only way you’ll know how to optimize your site and develop a working SEO strategy.
The good news is that SEOPress has some intuitive plugins that will help in a few key areas:
Check your site’s rankings
SEOPress Insights is a WordPress plugin that gives you professional SEO tools to track your rank and backlinks. It works off-site, constantly monitoring keyword ranking and analyzing backlinks straight from your WordPress site. You can input your own keywords and get sent daily rankings to see how your pages are performing – and if they’re dropping down or rising up.
The Insights plugin also helps you detect problems and act on them before it’s too late and your website is lost amongst your search rivals. Speaking of which, there’s a handy tool to help you find who holds the number 1 spot on the keywords you track. You get more data on your biggest rivals to see what they’re doing well and how you can improve.
Keywords aren’t the only thing you can track in SEOPress Insights. It lets you monitor and analyze all of your backlinks. Armed with this data, you can detect negative SEO from sites sending poor-quality links to your site to harm your search ranking. Backlink analysis also helps you make better decisions when building links, improving your SEO.
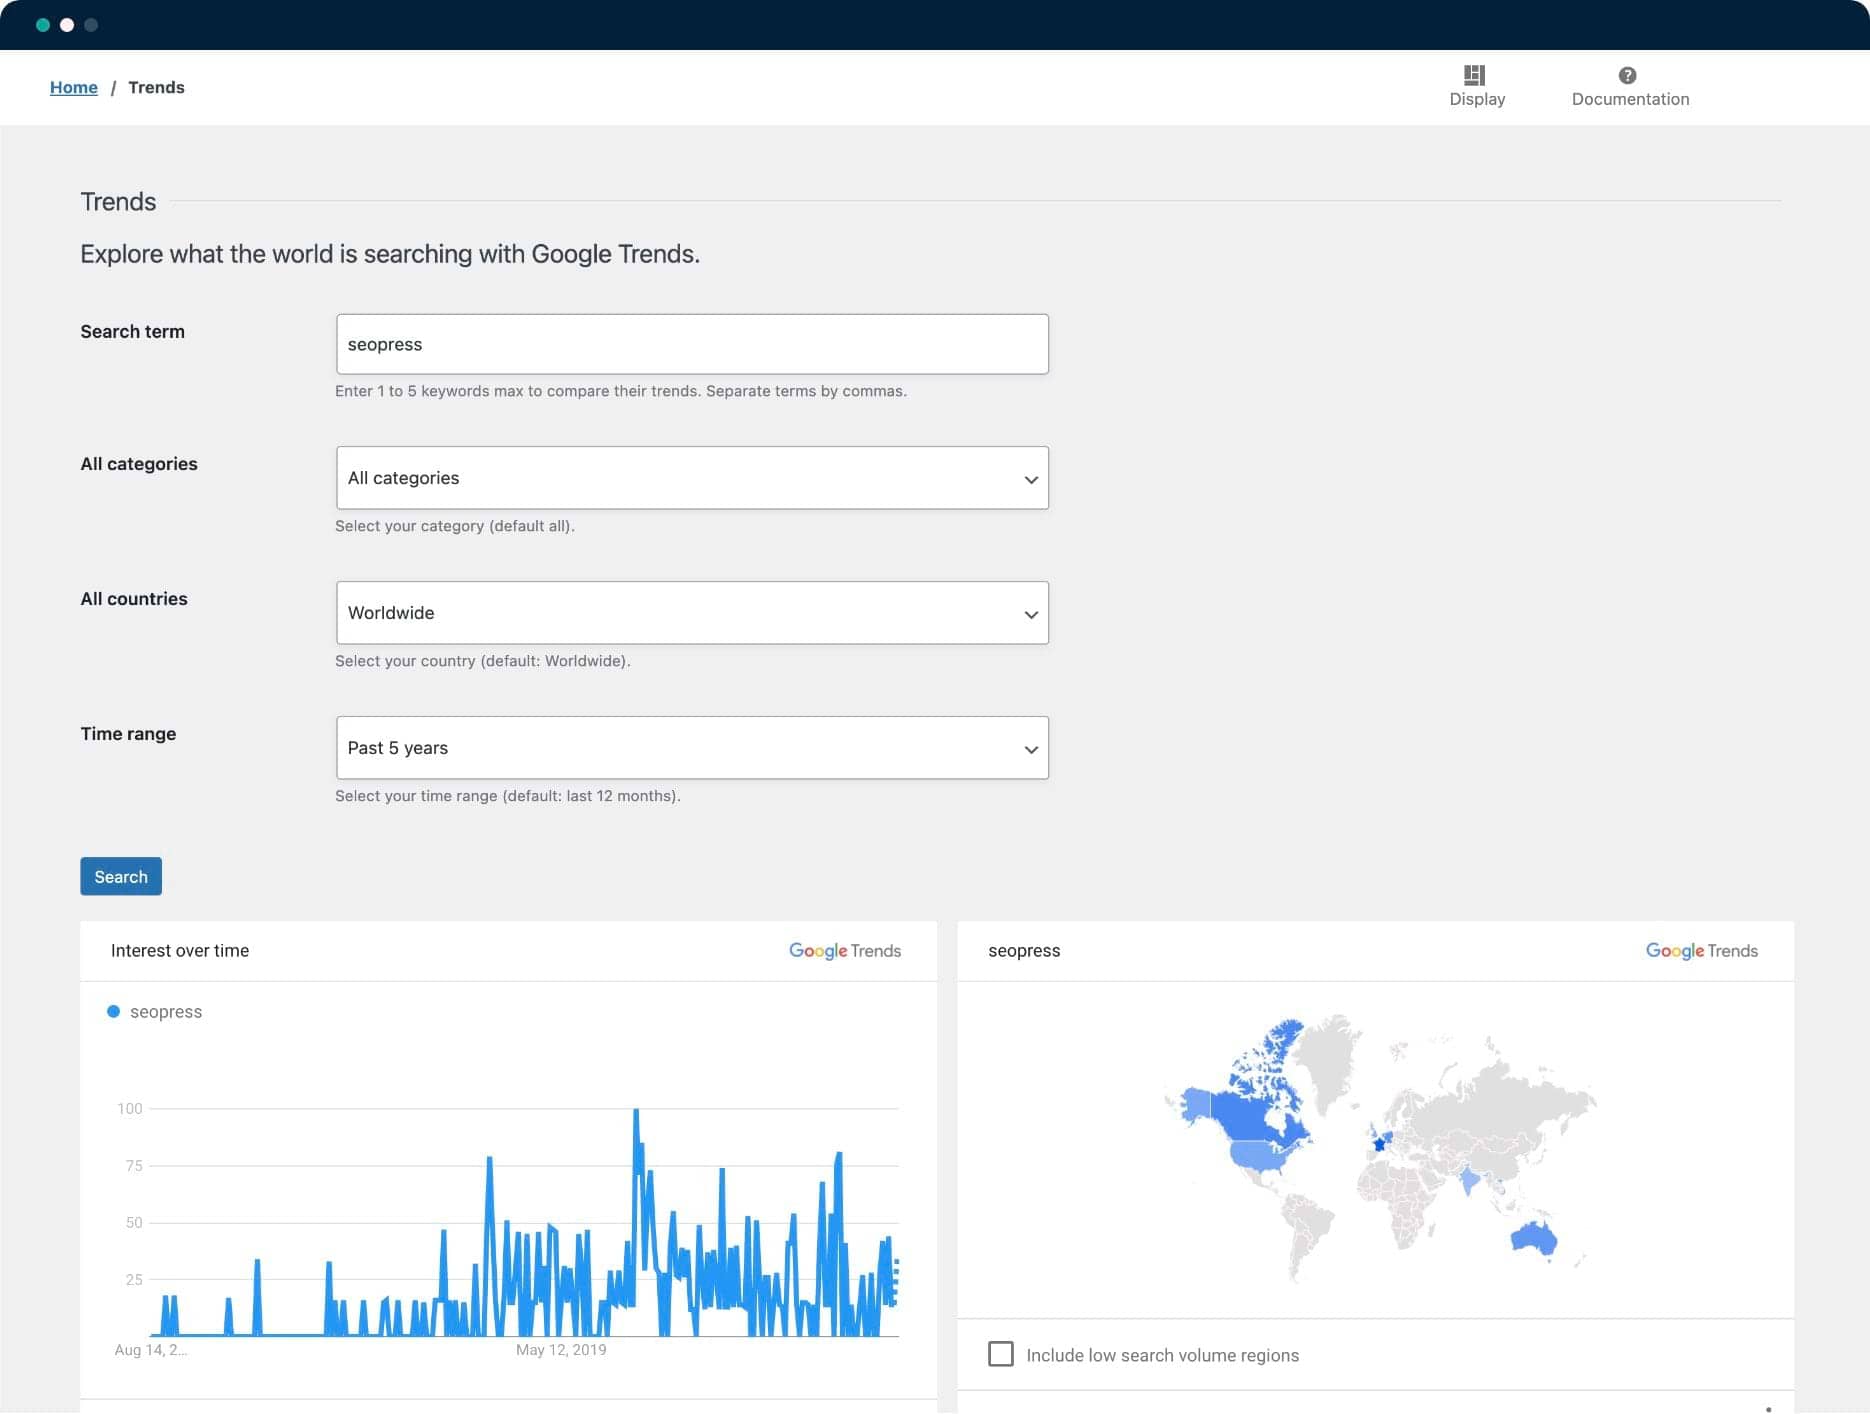
Finally, Insights lets you see what the world is searching for with Google Trends. Search by term, category, country, and time range to see the most popular results. This is a fine way to tune yourself to your audience and generate new content ideas.
Check your site’s traffic and performance over time
SEOPress PRO perfectly integrates with Google Search Console. In turn, this lets you see key metrics such as clicks and positions directly in the WordPress backend. You understand way more about how people visit your site and what they do while they’re there.
Viewing this information is very useful, as is the ability to audit your live URL. You can do this thanks to the GSC integration, meaning you can inspect your URL for details about crawling, indexing, mobile compatibility, and more.
Moreover, SEOPress PRO also comes with Google Analytics integration. Here, you’re able to learn the answers to very important questions. For instance, how many users visit your site? How many sales have you generated? What information can I find about user demographics? It’s all possible with GA integration and SEOPress PRO.
This tool is perhaps most useful for individuals with a WooCommerce store. You can send product data directly to Google Analytics to measure purchases, see what people add to shopping carts and gain lots of data on users’ purchasing/browsing habits.
The key advantage of integrating Google Analytics with SEOPress is that you’ll be able to see all your important data on your WordPress dashboard, making it far more convenient. It’s even possible to link your Google Ads account with Google Analytics to track information on all visitors from advertising campaigns.

Get your WordPress website indexed faster with instant indexing
In this article, we’ve outlined the steps required to prepare your website for indexing, how to index it through GSC, and what to do if you suspect a problem.
Remember, your site must be indexed for it to rank! Indexing will take time, and Google states it can take at least a week for websites/pages to be indexed – starting from when you first submit things to GSC. If a few weeks have passed without your site being indexed, we strongly suggest following our tips above.
We’ve also introduced you to SEOPress, an essential SEO tool for WordPress users. It’s particularly useful here as it has an indexing feature that lets you submit up to 200 URLs to Google for indexing every single day. This drastically speeds up the indexing process as you ping Google whenever new content is live, or if there’s old content that hasn’t been indexed yet.
SEOPress is available for free, but SEOPress PRO unlocks a wide range of extra features. Download it today if you want to get the full benefits of SEOPress, and enjoy better SEO optimization across your site.
Check out next week’s article to find out why having a sitemap matters, and how you can create much more powerful sitemaps for your WordPress website with SEOPress.