One of the best excuses for not changing your website is that it might “break your SEO”. Unfortunately, it happens. Many hard-earned rankings and traffic have been lost to a poorly managed site migration. We thought it would be useful to give you some advice to help you through the process and avoid the worse happening.
In part 1 of the article we’ll look at getting ready for the migration. In part 2 we’ll move onto the things to do on the day of the migration itself and shortly after.
1st piece of advice: include SEOPress in your new WordPress site installation 😉
What’s a site migration?
There are a lot of different reasons for migrating to a new site. You may want to change the design, add more pages, remove pages, change domain name or move over to WordPress from another CMS. Many migrations are motivated by a project to improve your SEO – realizing that just tweaking your existing website won’t be enough and you need to start afresh.
We’ll assume that you are making major changes to your site.
What could possibly go wrong?
How about all your pages disappearing from Google? That can happen on any search engine when you move from a staging site and forget to remove NOINDEX instructions from pages. It’s not always immediate. One of the first signs is when Google no longer suggests a cached version of your pages. You may also see your site listed but without meta description text in the snippet before it disappears altogether.
More subtlety, you may lose ranking over time because you deleted popular pages from your site or moved them without redirecting users from old URLs to the new ones. Or you may keep seeing old pages listed in search results months after you moved to the new site.
If something goes wrong moving from one domain to another and your site is down for a long period, that may also have a long-term impact on your SEO as Google reduces the crawls it performs of your site.
So let’s have a look at some advice to stop the worse happening:
Analyze your existing SEO
Even if you think that your current site is performing poorly in the search engines, there may be assets that you need to hold onto. For example, links from another site or a popular piece of content on your site. There are a lot of different tools you can use to get this sort of information but Google Search Console – a free tool – should be all you need to get the most important data for most sites.
Popular pages
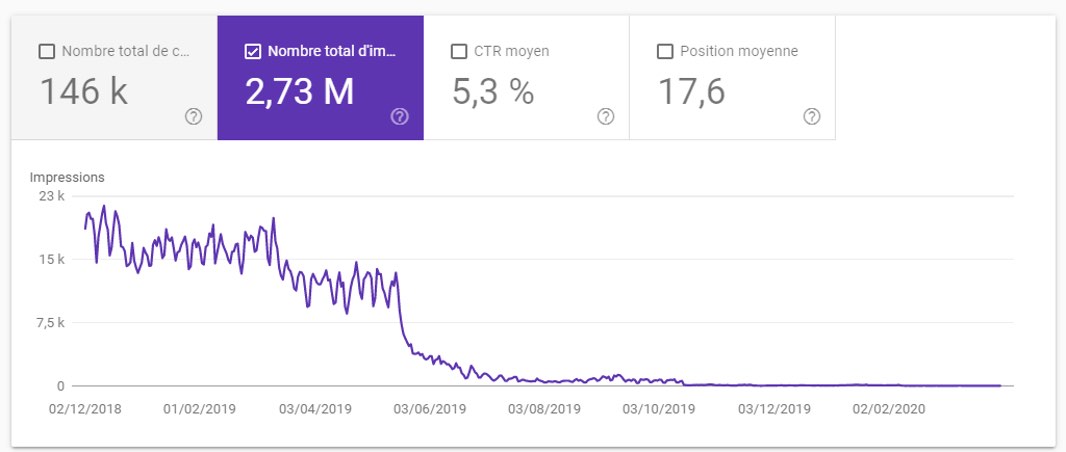
A good first step is to audit the URLs that exist on your current site and see which ones are getting traffic from search engines. Using the Performance report in Search Console, choose a date range of 16 months and then click on the “Pages” tab to see a list of all the URLs that have received visibility over the last 16 months. The number of times the page was shown in the search engine is the “impressions” column. The traffic you received is under “clicks.”

This report will list up to 1000 URLs and in most cases this will be enough. Later the list will help you set up redirections to new URLs. For the moment you need to analyze the popular pages and make decisions about whether you are going to keep their content in the future version of the site or not.
Export this list to Excel or Google Sheets using the button at the top right of the page.
If you are curious about what keywords are used to find certain pages, you can click on the page in the list and then click on the Queries tab.
Links
Staying in Google Search Console, you can use the “Links” reports to see who’s linking to you and which pages of your site are popular.
Links are an important asset in SEO because links from one site to another are used as a ranking factor. When you change your site, you want to be sure that existing links to the site continue to work and bring users to the content they were expecting. This can be done through redirections which we’ll discuss below.
To find the URLs receiving the most links, use the External Links, Top Linked Page report. Click on “More”.
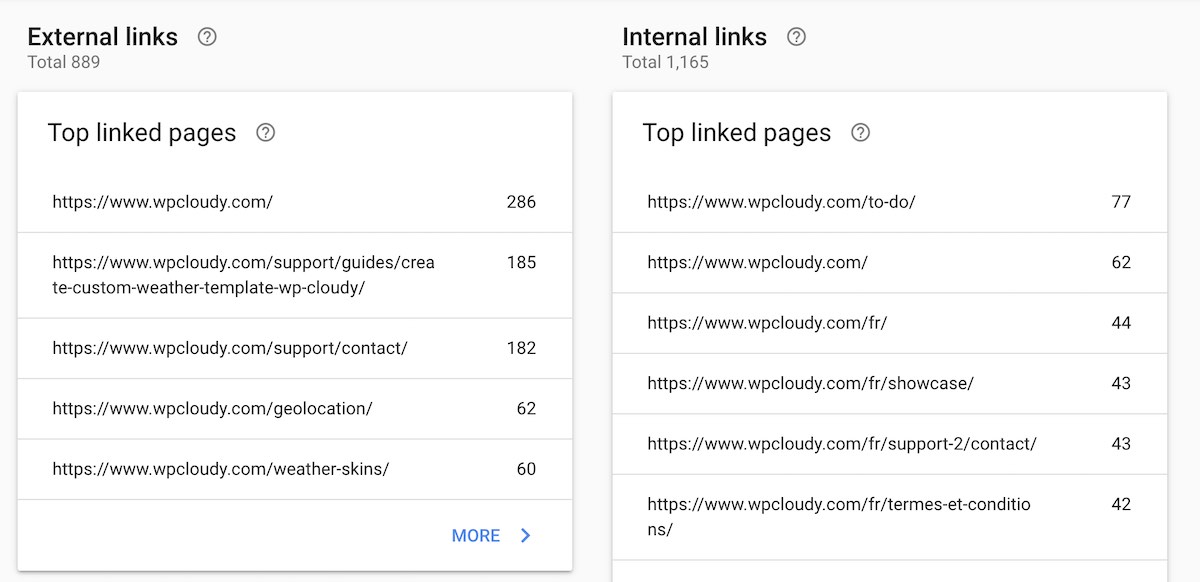
The report will give a complete list of pages on your site receiving links from other sites. For each page you will see the number of links and the number of individual sites (one site may have multiple links to yours). It’s important here to understand what content on your site is popular. If a content has lots of links, it’s a good idea to provide this same content (or a better version of it) on your new site.
You can export this list to Excel or Google Sheets too.
If you are interested in seeing exactly which sites link to each URL, click on the URL.
Going back to the Links dashboard, you can export a sample of pages linking to your website and have a look at the Top Linking Sites.
We suggest exporting all these reports to save this snapshot of your data for later use.
Preparing redirections
Redirections are instructions on your server to indicate that a page has changed URL.
A simple example is when you change domain name, you’ll want people who knew the old domain name to be redirected to the new one. For example:
https://www.mysite.com/ to https://www.mynewsite.com/
You can think of this as using a forwarding address when you move home, but in the case of a site migration it applies to every page on your website – it’s like forwarding addresses after moving a townful of people.
If you are just changing domain name but not the internal structure of your URLs, you can have one redirect that just changes the domain name on incoming requests. Everyone moved town, but they moved to exactly the same street and street number in the new town.
However, if you will also be changing the internal structure of URLs, for example:
https://www.mysite.com/product-shoes123.htm will be https://www.mynewsite.com/shoes/mens/nike-air-max-plus-iii/
you will need to set up redirections individually. Here everyone moved to a new town, but also to a new address in the town.
The other possibility is that you keep the same domain name but change the structure of URLs. Everyone in the town built and moved to a new house!
Prepare for these redirections in a spreadsheet. List all the existing URLs in the first column using the list exported from the Performance report in Google Search Console. In the second column, line by line, indicate what the new URL will be.
This is an important step in preparing your migration. If you realize an existing page will have no real equivalent on your new site, the honest choice is not to redirect. For example, if you stop selling shoes, then you can’t redirect https://www.mysite.com/product-shoes123.htm to an equivalent page of your new site. You should leave it without a redirection and a 404-error message.
If you start to realize that lots of your old pages won’t have equivalents on the new site, check to see if these pages were also popular link targets. If you are going to lose lots of popular links, your rankings may suffer globally.
Note that redirecting all these pages to your home page is not a great solution. Search engines may detect that the link no longer sends users to the same content. The site that created the link may also realize that and remove the link.
If those links are so important you don’t want to lose them, you may change your mind about not selling shoes or include content on shoes on your new site.
For blogs that have been going a long time, you will have to make decisions here about what old posts you are going to keep in the new version. If you see that a post is popular and obtains lots of links, then the content is worth keeping on the new site. Maybe refresh or publish it as a new article.
Use a staging site
When migrating to a new site, the best practice is to keep your old site online while you work on the new one on a staging and only migrate when you are absolutely sure you’re finished. If you ignore this advice and decide to start editing a live site there is a risk of creating errors or even crashing your site while you’re working on it. Google does not recommend using “site closed for maintenance” pages for long periods.
You can work on the new site locally using a localhost, but it is a good idea to go online at some point to test the new site in its final hardware environment. You can use a subdomain of your current server or – if part of your plan is changing domain name and hosting – start directly on a new server.
When working on an online staging site, it is extremely important to stop Google discovering and indexing it.
Recommended solution: HTTP Authentication
Recommended practice is to use password protection. Basic HTTP authentication using .htpasswd is the best solution.
Your hosting provider may provide a solution for implementing this. For example, the HTPASSWD tool on Kinsta.
NOINDEX in ROBOTS tag
An alternative option is to set NOINDEX in a ROBOTS tag on each page of the site.
You can do this using SEOPress using the feature in SEO > Titles & Metas > Advanced. Check the “noindex” option to request search engines not to display the pages of the site in search results.
WordPress’ Search Engine Visibility option
WordPress has a Search Engine Visibility option to “Discourage search engines from indexing this site.” You can find this option in WordPress at Settings > Reading, but as the disclaimer mentions “It is up to search engines to honor this request.”
This option NOINDEX, NOFOLLOW ROBOTS tag to every page of your site. This looks like this:
<meta name='robots' content='noindex,nofollow' />
In earlier versions of WordPress, this option also changed the robots.txt file, but this is not a good idea.
However, nothing guarantees you by using the meta robots solution noindex, nofollow that some of your content will not be indexed and displayed in the search results. This method is to be used as a last resort if you are not able to set up protection by .htpasswd file.
Avoid Disallow in ROBOTS.TXT
Disallowing robots from indexing sites is not a good enough protection to stop staging sites from being indexed. It may be particularly ineffective for new domain names. Avoid using it when using NOINDEX ROBOTS tags to protect a site. To make sure that Google can discover all your pages (including those with NOINDEX tagss) use the following code:
User-agent: *
Allow: /
Google warns against using Disallow and NOINDEX in its guide on blocking search indexing.
Finishing the staging site before migrating
When you are happy with your staging site, you will be ready to go online and redirect the old site to the new one. We’ll go over the steps for this in the next article.
A few last things you may want to check on your staging site:
Internal links. If you started your staging site with a copy of the content from a previous site you may need to correct internal links between pages. You can use SEOPress’ Broken Links tool to detect these. Go to SEO > Bot and click “Launch the BOT.” If you have more than 100 pages on the site, you will need to increase the number of pages to scan in the Settings tab. Use your spreadsheet of redirections to help correct those links.
Image URLs. If your site receives a lot of traffic from image searches, you should also consider planning redirections for image URLs. Moving from one WordPress site to another, it may be best to maintain the same media library and not change image URLs at all.
Sitemap. Search engines will index the new site quicker if you provide sitemaps. Use SEOPress’ XML / HTML Sitemap to set these up on the staging site.
Mobile testing. Google is a mobile only search index now. Remember to check your staging site on mobile.
You can read the part 2 of this article here.
